🕹️ Manual Flight Control
Once your drone is fully activated and calibrated, you can begin manual flight operations using the RoBeeX App interface.
Account Requirement
If you have not yet logged into your RoBeeX account, you will need to do so before proceeding. Please refer to the Account Management page for detailed steps on how to create, access, and manage your account.
🔌 Connecting to the RoBeeX AI Drone
This procedure establishes the direct Wi-Fi link between your device and the drone for manual control, programming, and real-time video feed.
Connection Instructions
- Power On:
- Power On: Turn on your RoBeeX AI Drone. (For detailed instructions on battery charging , installation , and powering on the drone, please refer to charging and battery)
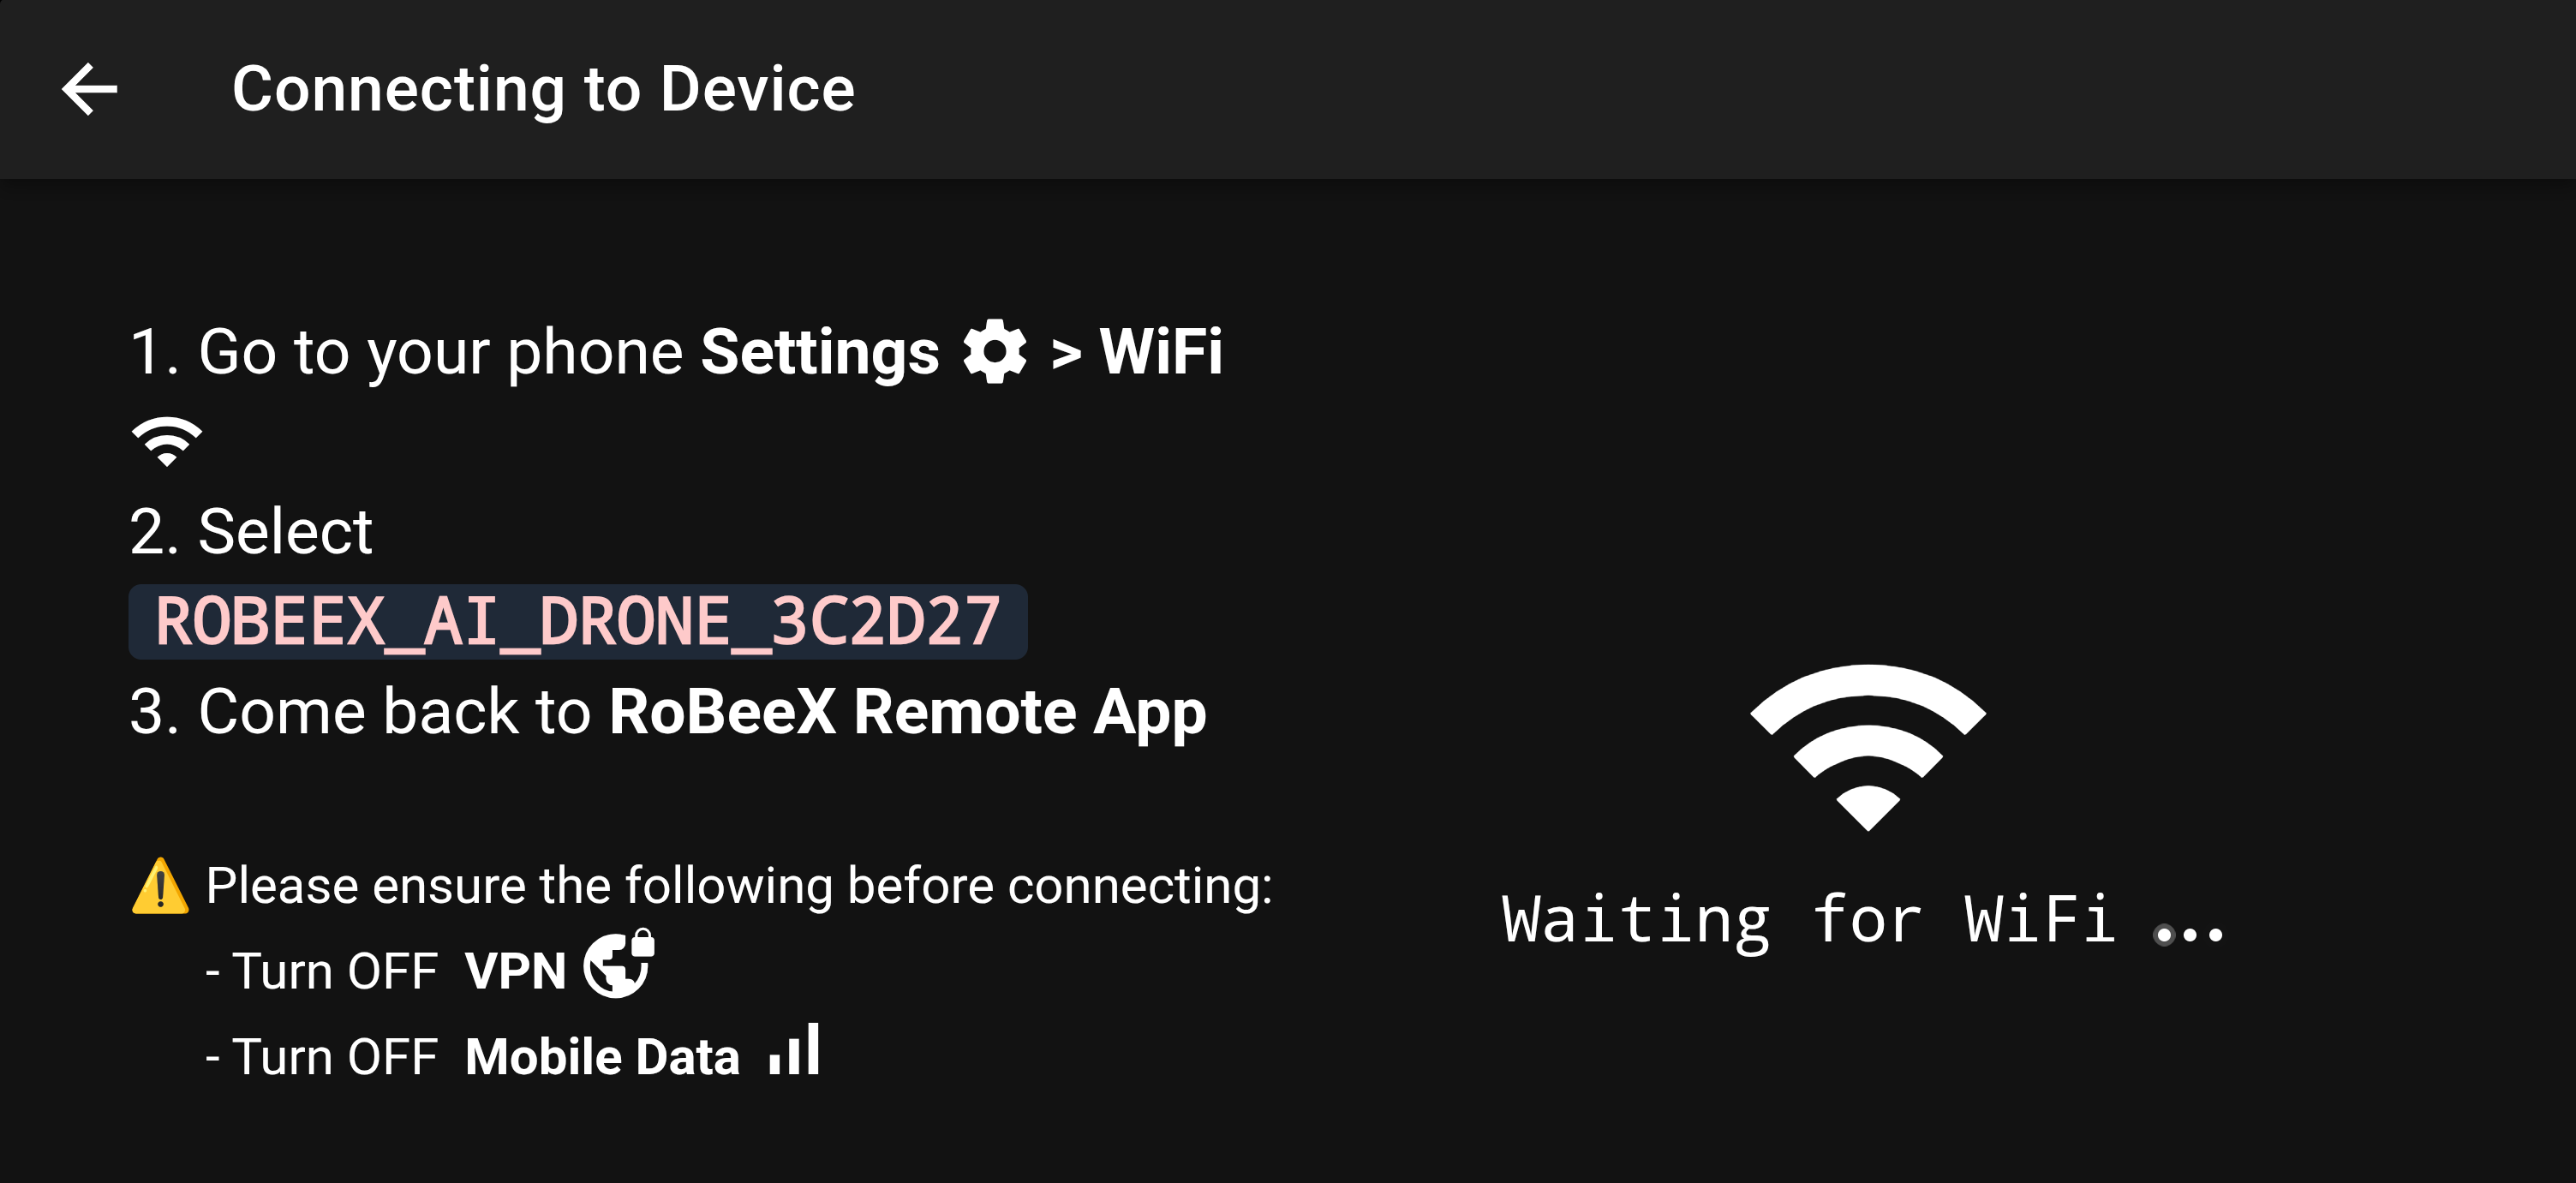
- Wi-Fi Connection:
- Step 1: Go to your device's Settings (⚙️) → Wi-Fi.
- Step 2: Select the drone's Wi-Fi network (e.g., ROBEEX_AI_DRONE_XXXXXX).
Wi-Fi Password: The default password for any RoBeeX AI Drone is
1234567890. - Step 3: Come back to the RoBeeX Remote App.
- App Status:
- The main app screen should update to show "Connected" and the Wi-Fi symbol will turn green.

🚨 Connection Prerequisite Notice
IMPORTANT: Please ensure the following settings are TURNED OFF on your mobile device or laptop before attempting to connect to the RoBeeX Drone's Wi-Fi network:
- Turn Off VPN (Virtual Private Network).
- Turn Off Mobile Data.
To begin flying, press the "Manual Control" button located on the main application dashboard. This will open the flight screen, which contains the virtual joysticks and control inputs.
⚠️ Pre-Flight Requirements & Safety Checks
INFO
Before launching your drone, STOP and ensure you have completed the following essential setup steps and safety checks:
- 💾 App Installation & Account: Ensure the app is installed and you are logged into your account.
- ⚡ Drone Activation: Confirm the drone has completed its mandatory OTA update.
- 🎯 IMU Calibration: Ensure you have completed the IMU (Accelerometer and Gyroscope) calibration following activation.
- 🔋 Battery Check: The battery must be fully charged (100%). Do not fly below 30% charge.
- ⚙️ Propeller Check: Inspect all propellers for damage (cracks, bends, nicks) and ensure they are securely mounted to the motor shafts.
- 🛡️ Propeller Guards: Install the propeller guards for safety, especially when flying indoors or close to obstacles.
🔴🟡 CRITICAL WARNING: Sensor Error
If the drone's RGB LEDs start flashing alternating RED and YELLOW (🔴🟡), this indicates a critical sensor error and confirms that the IMU (Inertial Measurement Unit) needs immediate calibration.
- Action Required: You must immediately refer to the IMU Calibration
🛑 Critical Flight Safety Warnings
DANGER
- NEVER Fly Over People: Do not fly the drone over the heads of humans, children, or pets. Maintain a safe horizontal distance.
- Propeller Hazard: NEVER insert your fingers or any foreign object into the propellers while they are spinning or during flight.
- Hot Motors: The motors will become
VERY HOTafter every flight.Do not touch the motorsimmediately after landing to prevent burns.
DANGER

- EMERGENCY KILL BUTTON: The large red "
KILL" button is a critically important emergency stop feature that immediately cuts power to all motors in any condition. Only use the KILL button in an emergency to prevent injury to people or catastrophic damage to property.
🚀 The Flight Interface
The flight interface provides your live video feed, virtual joysticks, and critical telemetry data.
📊 Telemetry and Status Bar

| Indicator | Range | Description |
|---|---|---|
| Wi-Fi Icon | Strength Bars | Indicates the strength of the Wi-Fi connection between the drone and the app. |
| Battery Icon | 0% to 100% | Indicates the remaining battery charge level. |
| Y (Yaw) | Degrees | Heading rotation of the drone in degrees, relative to the takeoff direction. |
| D (Distance) | Meters (m) | Horizontal distance from the Home Point (takeoff location). |
| H (Height) | Meters (m) | Height of the drone relative to the surface directly beneath it (measured by the Lidar Range Finder). |
WARNING
🔋Low Battery Warning & Haptic Feedback:
- ⚠️ 30% Charge (Alert): When the battery level drops to 30%, the connected mobile device or tablet will provide slow haptic (vibration) feedback to alert the operator.
- 🚨 <15% Charge (CRITICAL): When the battery level is below 15%, the haptic feedback will become intense, signaling a critical low battery state and requiring
immediate landing.
🚨DANGER
⚠️🔥 Never use or charge swollen, leaky, or damaged Flight Batteries. Batteries in this compromised state pose a severe risk of catching fire.
🧭 Virtual Joystick Controls
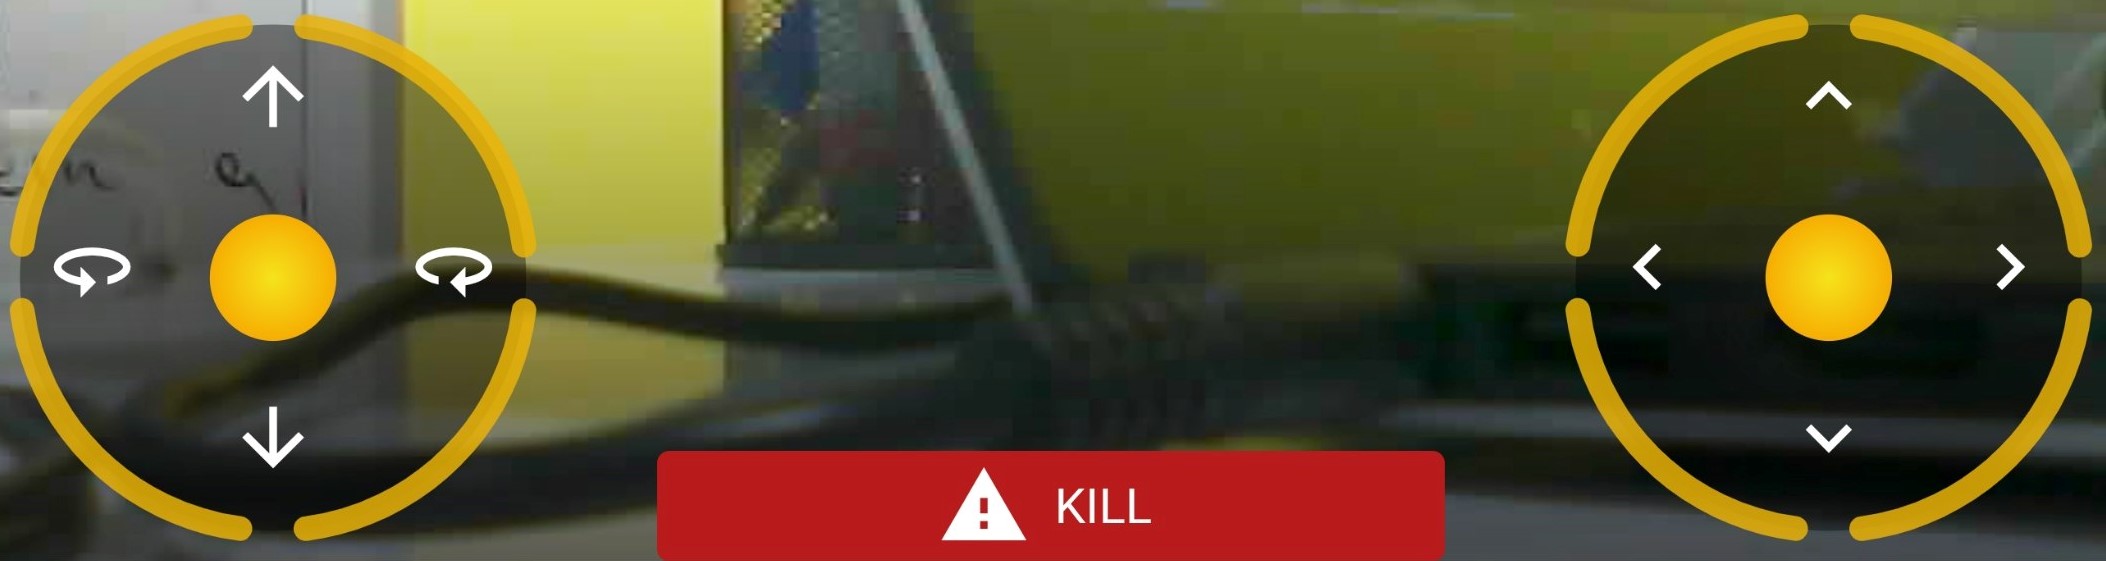
The RoBeeX AI Drone is controlled using two virtual joysticks on the mobile app screen. These joysticks govern the drone's movement across four axes: Throttle, Yaw, Pitch, and Roll.
1. ⬆️ Throttle (Left Stick, Vertical Axis)
Throttle controls the vertical movement of the drone. It adjusts the total power supplied to all four motors simultaneously.
- Function: Altitude (Ascend / Descend)
- Action:
- Push Up: Increases total motor power, causing the drone to Ascend.
- Pull Down: Decreases total motor power, causing the drone to Descend.
2. 🔄 Yaw (Left Stick, Horizontal Axis)
Yaw controls the rotation of the drone around its central vertical axis. It changes the direction the nose of the drone is facing without changing its horizontal position.
- Function: Rotation (Heading)
- Action:
- Push Left: Rotates the drone Counter-Clockwise (Left).
- Push Right: Rotates the drone Clockwise (Right).
3. ↔️ Roll (Right Stick, Horizontal Axis)
Roll controls the side-to-side (lateral) movement of the drone. The drone slightly tilts its body to the left or right to create a sideways thrust.
- Function: Lateral Movement (Strafe)
- Action:
- Push Left: Tilts the drone left, causing it to move Left (Strafe).
- Push Right: Tilts the drone right, causing it to move Right (Strafe).
4. ↕️ Pitch (Right Stick, Vertical Axis)
Pitch controls the forward and backward movement of the drone. The drone tilts its nose up or down to create forward or backward thrust.
- Function: Translational Movement (Forward / Backward)
- Action:
- Push Up: Tilts the nose down, causing the drone to move Forward.
- Pull Down: Tilts the nose up, causing the drone to move Backward.
📸 Camera and Gallery Buttons
| Button | Icon | Function | Notes |
|---|---|---|---|
| Back Button |  | Returns to the previous screen or main dashboard. | - |
| Gallery Access |  | Opens the in-app media gallery to view saved files. | The number in a red circle below the Gallery button counts up with every photo taken. Refer to the Gallery Menu |
| Video Record |  | Toggles video recording on/off. | During recording, a Stop button and a recording time counter appear below the camera view. |
| Photo Capture |  | Takes a single still photograph. | The number in a red circle below the Gallery button counts up with every photo taken. |
TIP

Video Recording Status: When recording is active, the recording time and a Stop button appear at the bottom of the flight interface. The time displays the running counter in minutes and seconds (e.g., 00:03). Pressing the Stop button immediately halts the video recording and saves the file. For see all captured photos and videos, refer to the Gallery Menu.
⚙️Settings Menu Button
| Button | Icon | Function | Notes |
|---|---|---|---|
| Settings Menu |  | This central configuration hub is used to manage drone behavior, safety parameters, sensor calibration, account details, and view system information. | To access the Settings Menu and understand its configuration options, please refer to the Settings Menu. |
💡Bottom Flash LED Button
| Button | Icon | Function | Notes |
|---|---|---|---|
| Bottom Flash LED |  | Toggles the Bottom Flash Light LED on or off. This light aids in low-light landing and ground visibility. | The brightness level is configurable in the Settings Menu via the Settings Menu. |
TIP
Advanced Control: Bottom Flash Light LED can also be controlled and programmed using coding languages such as Blockly, Python, and Arduino.
🚦 Takeoff and Landing Buttons
The RoBeeX App uses dedicated on-screen buttons to safely initiate automatic takeoff and landing. Both functions require a Press and Hold confirmation to prevent accidental activation.
⬆️ Automatic Takeoff
- Preparation: Place the drone on a flat, level, and clear surface.
- Initiation: Tap the "Auto Takeoff" button (
 ) on the right side of the flight screen.
 - Confirmation Pop-up: A pop-up window will appear, displaying a large "Take Off" button. (See image below).
- Execution: Press and hold the central "Take Off" button until the yellow circle indicator is complete (the yellow circle around the button fills up).
- The drone will automatically start its motors and ascend to a safe altitude of 0.5 meters (50 cm), where it will hover.
WARNING
Takeoff Space: Avoid taking off in confined spaces or directly above crowds to ensure the drone has clear access to the air.
⬇️ Automatic Landing
- Positioning: Fly the drone back to the desired landing area, ensuring the surface is flat and clear of obstacles.
- Initiation: Tap the "Auto Land" button (
 ) on the right side of the flight screen.
 - Confirmation Pop-up: A pop-up window will appear, displaying a large "Land" button. (See image below).
- Execution: Press and hold the central "Land" button to begin the procedure.
- The drone will automatically descend, reduce motor speed, and shut off the motors immediately upon contact with the ground.