Making Your First Program
This short guide walks you through creating a simple, working Blockly program for your RoBeeX device. You'll learn how to open the editor, assemble blocks, run the program, and troubleshoot common issues.
What you'll build: a repeating LED sequence that changes color and pauses — a friendly, visible way to confirm the device is responding to your program.
Prerequisites
- If you're not familiar with blockly we highly suggest to first read Reading the Introduction section
- Installing RoBeeX App on your computer / mobile phone
- A RoBeeX device powered on and connected to your computer / mobile phone
- The Blockly Editor open in your device (see the RoBeeX App → Programming → Blockly page).
- Basic familiarity with dragging and connecting blocks in the editor. More Info
If you don't yet have a device connection, you can still follow the steps in the editor and run them later when a device is available.
TIP
You can run blockly programs with out being connect to the device, in cases where your not using device related blocks (Flight, LEDs and etc)
Quick overview of the blocks we'll use
- Start / When run block — the program entry point.
- Loops (repeat forever or repeat N times) — to repeat the sequence.
- Light / RGB LED set block — to change LED color.
- Timing / Wait block — to pause between color changes.
- (Optional) Motor / Movement blocks — to add motion after the LED sequence.
Open the Block categories on the left to locate these blocks. If you can't find a block, try the editor's search or check the block-categories reference in the docs.
Program entry point
Every Blockly program starts running from the this block
Step-by-step: build the LED sequence
- Add a forever loop
- From the
Loopscategory, drag arepeat while trueblock and snap it under theWhenblock. Clicked
 - This keeps the LED sequence running until you stop the device.
- From the
- Set the first LED color
- From the
Lights(orLED) category, find the block labeledset RGB LED to color(or similar). Snap it inside the loop. - Choose a color (for example: red). Many editors provide a color picker — try
#FF0000for red.
- From the
- Wait
- From the
Timingcategory, drag awaitblock (for examplewait 500 msorwait 1 second) and place it under the LED block. Use 500–1000 ms for a visible blink.
- From the
Change to the next color
- Add another
set RGB LED to colorblock and choose a different color (for example: green#00FF00). - Attach a
waitblock after it.
- Add another
- Test the program
- Click on the Run Button
- Click on the Run Button
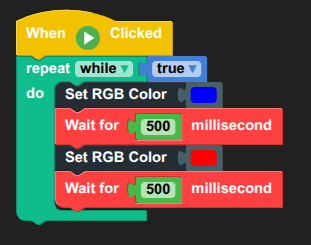
Example block layout (visual)
Imagine this vertical stack inside the workspace:
- When run button clicked
- Repeat forever
- Set RGB LED Color to
Blue - Wait
500 ms - Set RGB LED Color to
Red - Wait
500 ms
- Set RGB LED Color to
- Repeat forever
Common issues & troubleshooting
Disabled Run Button
- Delete any dangling blocks (blocks that are not connected to any other blocks / left alone)
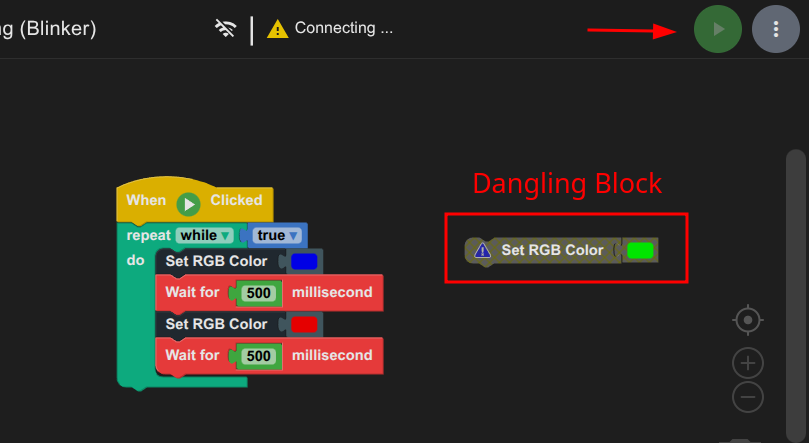
- Delete any dangling blocks (blocks that are not connected to any other blocks / left alone)
No connection to the device
- Turn Off / Disable any kind of
VPN / Proxyas it may interfere with RoBeeX WiFi Network - Turn Off
Mobile Dataas it may interfere with RoBeeX WiFi Network - Make sure your WiFi is connected to
ROBEEX_AI_DRONE_XXXXXX
- Turn Off / Disable any kind of
TIP
You can check Troubleshoot Section for more info on common issues
✍️ Creating Your Own Program (Cloning and Modification)
The fastest way to write your own code is often to modify a working demo. Let's clone and modify the RGB Blinker to add a new feature: controlling the Bottom Flashlight.
Step 1: Clone the Blinker Program
- With the
RGB Blinkerprogram loaded, click the Save As button and give it a new name, such asBlinker with Flashlight.
Step 2: Add the Flashlight Blocks
- Navigate to the LEDs category in the Toolbox.
- Locate the block:
set bottom light [ON/OFF]. - Drag and connect this block inside the
repeat foreverloop, immediately after the firstset LED colorblock.- Set the block to
ON.
- Set the block to
- Now, drag a second
set bottom light [ON/OFF]block and place it inside the loop, immediately after the secondset LED colorblock.- Set this second block to
OFF.
- Set this second block to
Step 3: Run and Test
- Click the Run Button (🟢).
- Observe: Not only will the RGB light blink, but the dedicated bottom flashlight will now turn ON and OFF in sync with the color changes!
Congratulations! You've successfully modified a demo program to create a new, functional behavior for your RoBeeX device.