The Blockly Editor Interface
Before writing your first program, it helps to understand the main areas of the editor.
The editor is divided into a few key areas:
1. Blocks Toolbox (Categories)
The left-hand side contains the Toolbox, which organizes all available programming blocks into logical categories, such as:
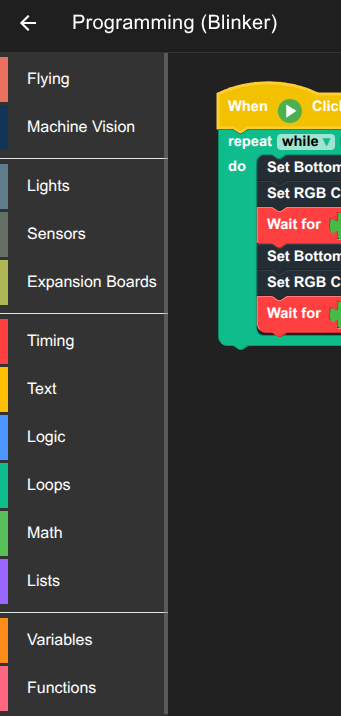
FlyingControls related to takeoff, movement, positioning, and landing of the drone.Machine VisionBlocks that use the camera for detection, tracking, and visual analysis.LightsBlocks for controlling LEDs or any onboard lighting effects.SensorsAccess to onboard sensor readings such as IMU, altitude, or distance sensors.Expansion BoardsBlocks that interact with additional hardware modules or external peripherals.TimingBlocks that control delays, intervals, and time-based operations.TextString creation, manipulation, and formatting utilities.LogicConditional operations such as comparisons, booleans, and branching.LoopsRepetition structures like count loops, while loops, and iterative patterns.MathNumeric operations, arithmetic, random numbers, and formulas.ListsBlocks for working with arrays, collections, and dynamic sequences of values.VariablesBlocks for working with arrays, collections, and dynamic sequences of values.FunctionsMake custom blocks / procedures containing multiple blocks
2. Workspace (The Canvas)
This large central area is your Workspace. This is where you drag blocks from the Toolbox and connect them to build your program logic.
3. Program Entry Points (Default Blocks)
All programs must start from a special block that defines when the code should execute. You will always begin by dragging one of these Entry Point blocks onto the Workspace:
TIP
Default Blocks like Program Entry Point are inserted in the Workspace by default
4. Telemetry and Status Bar
Located at the top of the screen, this panel provides real-time status of your RoBeeX device. Check here to confirm the following:
More info about device status bar Manual Flight > 📊 Telemetry and Status Bar
5. Run Button 🟢
The prominent Run (or Play) button is what you press to compile your blocks and send the program to your connected RoBeeX device for execution.
WARNING
The Run Button may be disable for the following reasons:
- Dangling blocks (blocks which are not connected to any other blocks)
- Possible errors in the program
⚙️ Managing Blocks
Adding New Blocks
To add a block, simply click and drag it from the Toolbox on the left into the Workspace area. Blocks will snap together when they are compatible, like puzzle pieces.
Deleting Blocks (Recycle Bin)
You have 3 ways to remove a block or a connected stack of blocks:
- Dragging to the Recycle Bin: Drag the unwanted block(s) to the Recycle Bin icon usually found in the bottom-right corner of the editor.
- Dragging back to the Toolbox Area (left-side): Simply drag the block(s) and release them over the Toolbox/Categories section on the left.
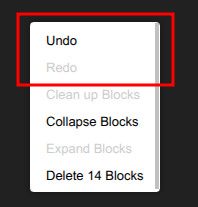
- Hold on the block (right click on desktop): Select
Deleteon the opened menu.
Undo
Hold on an empty space in the blockly workspace (right click on desktop) 😗* Select Undo on the opened menu.