⚡ First Power-Up: Device Initial Activation and Setup (Mandatory OTA Update)
After assembly and initial setup, the device must be activated by the owner during the first power-on. This process includes the following:
- Automatic Over-the-Air (OTA) updates for the aircraft
- Registering the device in the name of the builder/manufacturer
WARNING
CRITICAL REQUIREMENT: This activation and update step is required for the device to be functional and cleared for flight.
TIP
Process Overview: This step will activate and update the drone to the latest firmware. Afterward, you must calibrate the IMU for stable flight.
📋 Prerequisites
Before starting the activation process, ensure the following conditions are met:
INFO
- RoBeeX App Installed: You have successfully installed the RoBeeX App on your mobile or desktop device. (Refer to Install Application page).
- Account Logged In: You have successfully created and logged into your RoBeeX account within the app.To learn how to create and manage your account, continue reading this Account Management page.
- Wi-Fi Credentials: You must know the SSID (Network Name) and Password of the Wi-Fi network, which must operate on the
2.4 GHz frequency band, that the drone will use for activation. - Wi-Fi Access Point Internet Access: Your Wi-Fi Access point should have an active and reliable internet connection.
- Battery Level: WARNING: The drone's battery must be charged to at least 50% before starting the activation or update process.
1. 🌐 Initial Setup & Generating the Activation QR Code
RoBeeX requires an internet connection to perform automatic OTA updates and device registration. Therefore, you must provide your Wi-Fi credentials to RoBeeX using a QR code.
TIP
🎥 Important Activation Guide
Please watch this entire video carefully and follow the steps exactly as shown for the activation, firmware update, and IMU calibration of your RoBeeX AI Drone. The detailed instructions below serve as a quick recheck and precise reference to ensure the process is completed accurately.
🎥 Video Guide: How to activate the drone, update the firmware and calibrate the IMU
📝 QR Code Generation
📱 Open the RoBeeX App and click the prominent yellow "Connect to RoBeeX" button on the main dashboard.
➕ On the "Select a Device You Want to Use" screen, click the "+ Add New Device" button. If you have already added the device, click the "Update" button next to its name (This button only appears when a device update is available).
📶 In the connection prompt, enter the credentials for your local Wi-Fi network (the network the drone will connect to):
- Enter the Wi-Fi network's exact
SSID(Name), including the correct letter casing. - Enter the Wi-Fi network
Password.
- Enter the Wi-Fi network's exact
🔳 Click the "Generate QR Code" button.
- A unique QR code containing your network credentials will appear on the screen. Keep this QR code visible for the next step of the drone activation process.
WARNING
- 🌐 Ensure your Wi-Fi network has Internet access and that you can access the RoBeeX website through this network.
- 📶 Keep RoBeeX close to the access point to ensure a strong Wi-Fi signal.
WARNING
Your Wi-Fi Access point should operating on the 2.4 GHz frequency band
RoBeeX AI Drone only supports 2.4GHz Wi-Fi network and not 5GHz
2. 🚀 Drone Activation and Update
This process links the drone to your account and updates its internal components.
- Power On: Turn on your RoBeeX drone.
- Wait for Scan QR Code: Wait until the drone's RGB LEDs are blinking Sky Blue 🔵/⚫. This color indicates the drone is ready for activation and QR code scanning.
- Scan the Code: Hold the screen displaying the QR code approximately 30 cm (12 inches) in front of the RoBeeX camera.
- Wait for Scan Success: Keep the code steady until the drone's RGB LEDs begin the multi-step update sequence.
TIP
While the drone is in QR Code Scanning Mode, it is possible for the QR code to be detected incompletely.
In this situation, the drone's RGB LEDs will start blinking Yellow 🟡/⚫.
Possible reasons for incomplete QR code detection:
- Part of the QR code is outside the drone's field of view or is obstructed.
- The drone or the QR code is moving excessively.
- Reflections from a phone, tablet, or laptop screen may cause part of the QR code to become invisible from the drone's viewing angle.
3. 🔄 Firmware Update Sequence (takes up to 5 min)
As the activation and update occur, the four RGB LEDs will change color, indicating progress:
TIP
The firmware update process may take up to 5 minutes to complete.
WARNING
DO NOT Disconnect the battery while the drone is performing a firmware update.
WARNING
If the drone fails at any of the steps shown below, all RGB LEDs will blink red 🔴/⚫ for approximately 2 seconds,
after which the drone will return to QR code scanning mode (blinking sky blue 🔵/⚫) and wait for a new QR code.
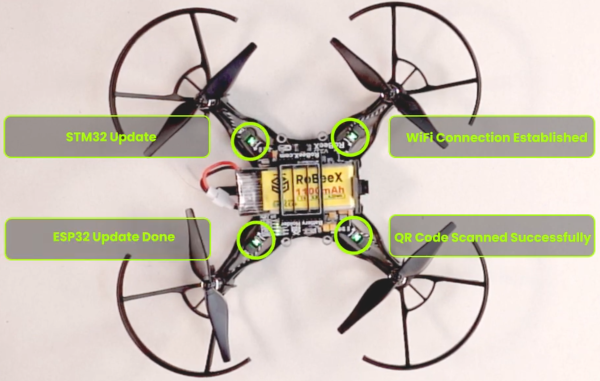
| RGB LED | Initial Status | In Progress | Final Status | Meaning |
|---|---|---|---|---|
| M1 | ⚫ Off | 🟢/🔴 Blinking Green/Red | 🟢 Solid Green | QR Code Scanned Successfully |
| M2 | ⚫ Off | 🟢/🔴 Blinking Green/Red | 🟢 Solid Green | Wi-Fi Connection Established |
| M3 | ⚫ Off | 🟢/🔴 Blinking Green/Red | 🟢 Solid Green | STM32 - Part 1 Update Done |
| M3 | ⚫ Off | 🟢/🟡 Blinking Green/Yellow | 🟢 Solid Green | STM32 - Part 2 Update Done |
| M4 | ⚫ Off | 🟢/🔴 Blinking Green/Red | 🟢 Solid Green | ESP32 Update Done |
✅ Post-Activation Steps
- Once all four LEDs blinked Green 🟢/⚫, the RoBeeX drone is activated and updated to the latest firmware.
- Also there the QR Code on the application will be gone after the application detectes that the update is done on the device (your phone / pc should be still connected to the internet)
IMU Calibration:
The blinking Red and Yellow LEDs 🔴/🟡 confirm that the drone now requires sensor calibration, which is sometime needed after a firmware update.
Please refer to the IMU Calibration page immediately to calibrate the Accelerometer and Gyroscope for stable and safe flight.